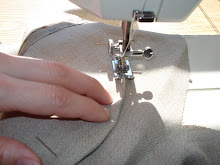
.JPG)
These are the Pocketbook Slippers, modified.
 The Slipper
- Cast on three stitches.
- Increase one stitch at the beginning of this row and at the end. 5 stitches. (this creates a rounded tip)
- Garter stitch or, knit each row for three rows.
- Increase one stitch at the beginning of each row until there are 22 stitches.
- This next row, knit the front and back of each stitch to get 44 stitches.
- K2, P2 Ribbing to end until the ribbing length measures 15cm or 6".
- Knit 2 together to return to 22 stitches.
- Return to Garter stitch, decrease one stitch at the beginning of each row until the are five stitches.
 Button Hole Strap
- Row 1: *Knit 1, yo, k2tog, k2.
- Row 2: Knit to end.
- Row 3: Knit to end.*
- Repeat until there are three button holes.
*After the last button hole: Slip 1, K2tog, Knit to end. (4 stitches)*
Repeat between *. (3 stitches)
- Bind Off Row: Slip 1, K2tog, pass slipped stitch over.
Bind off. - Weave loose ends.
 Finishing
- Fold horizontally, bringing the triangles together, sew the ends closed.
- Sew a button in the centre of the tab opposite the button hole strap.
- Fasten the button to the strap and slip onto foot.
Enjoy your new stretchy slippers that will fit most depending upon your gauge.
KnitWits Heaven published the Pocketbook Slipper pattern here.
Suggested changes brought to you by YarnyGirl.
And Handmade by Jennifer


13 comments:
I'm casting on with some alpaca from the stash! these are perfect for a swap I'm doing. I'm just a little worried about the sizing as my swap partner is a 6.5 and I'm a 9, I can't have her trying them on or anything. Maybe I'll go down to 5"?
Ah, decreasing the amount of ribbing=decreasing the width? This is such a clever pattern and I am glad you shared it.
Joan (yarngirl)
I've made a few of these from the original pattern. Just go with the size given. My GD is a size 7 and I'm 10 1/2 and it fits both of us find. There's a lot of give and take in these. Now I'm off to do this little button version. So SWEET!
~Found via Craftzine~
LOVE these. Perfect timing too with winter chill right around the corner. Thank you for the pattern.
Thanks for sharing this pattern. It inspired me to make a pair for myself and my daughter. I moderated the pattern for a two year old and posted the pattern on my blog. I hope you don't mine. I made sure to say the pattern came from you and linked to your blog. If for some reason you have any problem with this, just let me know.
jessica
Dear Mrs. M. S. Draves,
these slippers are for your collection.
(heart) Miss Twiss
I just finished mine! Just in time for the first frost in upstate NY.
Making some of these ASAP! Thanks for sharing.
I feel crazy asking this since no one else seems to have a problem with the pattern...but I'm wondering if there is a mistake in the Button Hole Strap.
You have 5 sts to begin and each row 1 (the YO row) adds a st for the buttonhole but doesn't have any decrease to compensate, so by the end of the strap, once 3 buttonholes have been made you are up to 8 sts wide. I couldn't tell by the photos if this was on purpose to have a flare at the end of the strap, so to play it safe I worked the YO rounds as "k2, yo, k2tog, k1" which centered the YO nicely in the middle of the 5 sts.
Also, after this the directions state to only "sl 1, k2tog, psso" as if there were only 3 sts on that row. But there would be either 8 sts (as written) or 5 sts if the strap is done straight.
I worked the last dec round as "k1, sl1, k2tog, psso, k1" which brought the 5 sts back to 3 to mirror the curve on the other strap.
Mine came out fine (although they will be frogged 'cus they're too big on me) but I wanted to know if these mods were what was intended all along, or if the flare was intended and the last row somehow makes sense?
Thanks!
Hi Jennifer,
I'm sorry my pattern is giving you some grief. It is on Ravelry and this is the first time someone has pointed out this problem, so let's review it together. (by the way, I don't have your email, so I apologize about it going this way.)
This is the instruction (with my comments for each row in brackets), after you have five stitches on your needle.
# Row 1: *Knit 1, yo, knit to end.
(increasing to 6 stitches. the "yo" is the increase)
# Row 2: Knit to end.
(in this row you are knitting the "yo" creating the hole... oh crap there should be a k2tog to bring it back to 5 stitches-just like you said! It is not my intention to have 8 stitches!)
# Row 3: Knit to end.* (five stitches)
Repeat until there are three button holes.
(You're right, there should be 3 stitches before this next part happens!)
# *After the last button hole: Slip 1, K2tog, Knit to end. (4 stitches)*
Repeat between * to decrease row to 3 stitches.
Bind Off Row: Slip 1, K2tog, pass slipped stitch over.
Bind off.
******
Thanks for pointing this out I really appreciate it.
I'll be posting the erratum this morning.
Cheers,
Laura
Thanks for getting back to me Laura! I can't find your direct email either so please send me one at jeloca@sympatico.ca, I have a comment about the corrections.
(p.s. my blog link is actually www.jeloca.com)
thanks!
Jennifer
http://www.jeloca.com
Post a Comment