.JPG)

Fabric: 5cm x 75cm times two
Instructions:
- Sew narrow ends together.
- On sewing machine or serger, sew up a length of thread tail prior to sewing.

- With right side of fabric facing up, fold a 2cm overlap underneath, bring thread tail over the middle section of the length of your piece to be sewn.

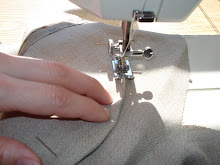
- Fold the piece over, while bringing right sides together, make sure the thread tail is still in the middle. Sew the long edge while maintaining the thread tail is free. See the thread tail?

- If you take a look at my thumb below, you can see the thread tail poking from the fold.

- When there isn't enough thread tail to peep out, gently pull the tail to give it the slack it needs. You want to complete the sewing of this length with the thread tail at the end.

- Gently pull the belt inside out, but do not pull it past your sewing machine foot. Not just yet.

- Keep the thread tail close to the fold of the piece.
- Sew to the end.

- Cut your threads and pull the remaining belt until it is completely turned.


- Tuck long thread inside the seam allowance. Tie ends.


- Voila! A belty thing.


6 comments:
You are amazing, I always wondered how you turn such a skinny thing inside out after you sew it. . . magic.
What a pretty idea! I love the effect and the nice addition it gives to your ensemble.
So simple, yet so stunning. It looks great tied in a bow in your photo. I'm so glad that you're back in action!!!
You are clever! Thanks for your comment the other day ;-)
nice blog design.. not sure if id be able to wear the belt though ;-)
Paul, cutie Paul, thanks for the compliment about my blog design.. however, it's about making the belt, not wearing the belt though.
Boys.
Post a Comment